

SunTouch TapeMat 36"

Instructions + Video
INTERIOR floor heating application only. Embedded in mortar or self leveling concrete only.
Installation Steps:
-
Step #1
Step #2
Step #3
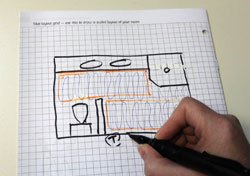
Plan Your Layout
Measure and draw a layout simple plan (or send it to us and let us draw a layout for you) mark your Thermostat location (starting point for mats) and what areas you want to warm. Expect to place mats everywhere you want warmth heat does not spreadRoll Out Mat(s)
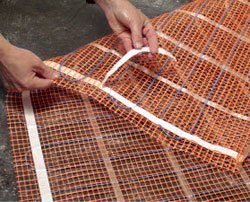
Turn and cut mesh (if needed) to custom fit to your room. Attach mat to subfloor with the built-in tape then mount the SunStat and place floor temperature sensor between 2 heating wires.Cover with Mortar
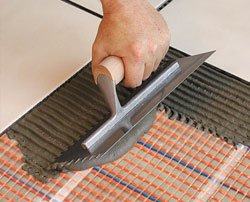
Cover mats with a cement based mortar, let it cure, then install your floor covering. If you are installing tile, you can install the tile when you apply the mortar. Connect mat power leads to your thermostat in parallel.
50 Degrees F / 10 Degrees C
| Mats or Wire | Supply Wire | Breaker | |||
| VAC | total amps | (AWG*) | qty | type | rating |
| 120 | up to 12 amps | 14 | 1 | single pole | 15 or 20 A |
| 120 | up to 15 amps | 12 | 1 | single pole | 20 A |
| 240 | up to 12 amps | 14 | 1 | double pole | 15 or 20 A |
| 240 | up to 15 amps | 12 | 1 | double pole | 20 A |
* Recommended only. Follow local codes for wire gauge size.
15 Amps
20 A Breaker
Yes, can be installed in a tiled shower. UL listed, verify local code.
Minimum 3/8" x 1/4". Dependent on tile size - verify with tile/mortar manufacturer.
Install 4-6" away from the toilet drain wax ring. It can be under the front of toilet - Approximately 20" from wall.
Specifications
| UPC | 840213036959 |
|---|---|
| Heating Power Output Total | 4920 BTU total |
| Heating Power Output per Hour (BTU) | 41 BTU per Sq Ft/Hour |
| EMF (Electro Magnetic Field) | Yes. Verified by Independent Testing Laboratory as ultra low. REET test |
| Ohms Reading (resistance value) | 34-43 ohms |
| Power Lead Wire Gauge | 14 AWG |
| Power Lead Length | 10' |
| Power Lead Type | Armored, NEC color code, Single point connection at 1 corner of mat. No return wire like inferior products |
| Thickness | 0.122 (less than 1/8") |
| Voltage | 240 VAC |
| Wattage per SF | 12 |
| Spacing of Heating Wire | 3" |
| Manufacturer | Watts Radiant |
| Heated Area in Sq Ft typical | 120 |
More Details
| Brand Name | SunTouch |
|---|---|
| Safety Listing | UL (Underwriters Laboratory) Listed for U.S. and Canada under UL 1673 and CAN/CSA C22.2 No. 130-03, File No. E185866 |
| Length of Heated Area (ft) | 40' |
| Length of Heated Area (in) | 480" |
| Warranty from Manufacturer | 25 year warranty backed by USA Manufacturer since 1873 |
| What's In The Box | TapeMat, Detailed Installation Manual. Installation videos online. |
| Amp Draw | 6 |
| Wire Construction | ETFE Fluoropolymer, metal shield and Outside layer of PEX |
| Total Watts | 1440 watts |
| Size in Feet | 3' x 40' (3x40 feet) |
| Size in Inches | 36" x 480" (36x480 inches) |
| Size in Meters | 0.91m x 12.19m (0.91x12.19 meters) |
| Acceptable Floor Coverings | Natural Stone,Tile, Laminate, Engineered Woods, Carpet, Vinyl, Linoleum, Solid Hardwood (if you use sleepers) |
Reviews
Customer Reviews
Very affordable pricing, in fact the best price I found on the web. There are helpful instructions - both from the manufacturer and also tips on the seller’s website. Prompt shipping, product arrived in good condition.
The wire and the connections all seem very solid and well made - nothing seemed cheap - which is good as it is buried under a lot of thinset and tile! I did put in one backup thermostat sensor wire - cheap insurance!
1. SunTouch Tape Mat, 120v, 24"x7'6"
2. SunTouch Sunstat Non-Programmable Dial Control
Installation was on a minor renovation of a guest bath, under ceramic tile on concrete slab floor. My installer was a young man, just starting in the general contractor business who had not done a radiant floor before. He and I viewed the install video and read all the guidance and did the install together.
Installation: I did most of the wiring. My contractor decided to lay the mat with a minimal layer of thinset, then let that harden before laying the tile on top. He was concerned with having to lay tile over the mat only attached to the floor with the tape. Only complication was that the floor was then not perfectly smooth (thinset over mat somewhat irregular) but by having the mat firmly installed the tile setting task wasn't so critical in care to avoid the loose mat. I checked wire integrity before, during, and after it was set in the thinset.
Operation has been checked and is fine.
I plan a future remodel of the master bath and will install a much larger area of mat, and will use a more standard programmable thermostat because I will depend on the mat for supplementary heating in the bath area. I have installed solar electric and planned for additional power consumption so power use will not a factor.
Your install video and installation instructions were very helpful.
I have installed two mats (1-2’X5’ and 1-3’x5’) together on an un-insulated concrete floor in a kennel stall with the heat probe and T-stat as a test. So far it has met my expectations.
I have recommended the process be applied in the rest of the guide dog kennels.
The installation went fine with the exception that a lead wire was cut during installation and went undetected until floor was installed. We were able to trace and repair the wire with exceptional help from Tech. Service. Not only was the product great so was the service.
Be sure to read and follow the instructions and there will be no problem.